It was a night like any other, an unremarkable weeknight. BP and I had just returned from our after-dinner-stroll with NachoDog, and we were ready to settle in for some evening entertainment. We’d been bingeing ‘Bake Off’ but decided to switch it up a bit. It was an easy decision to go with ‘Ugly Delicious.’ The next episode was fried chicken!
Little did I know that this 55 minute episode examining fried chicken (and why we eat it, as well as the cultural and anthropological background of this food) was going to be a total game changer for me. It wasn’t going to be my usual culinary chaos. I would approach this from a scientific standpoint, documenting the entire process to the best of my abilities, testing variables along the way. I would start laying the groundwork for future signature dishes. I would crack the mysterious magic of making fried chicken at home. With science! We were only half-way through the episode when I turned to BP to declare, “I’m making fried chicken this Sunday!” Sundays are when we have a treat meal for dinner. The only rule is that we have to make our treat meal from (mostly) scratch—it can still be on the ridiculous/decadent side, but it must be made at home.
Seriously though, watching Chef Sean Brock make mouth-watering, succulent, juicy, crispy and crunchy fried chicken was a tantalizing experience, and although I wanted to take a few liberties and change things up to suit my personal tastes, I would base my recipe test off of his fried chicken recipe. You can find the original recipe here, but be forewarned that the formatting is kind of a mess, so it’s not the easiest to read.
Before we delve into the thick of things, there’s something you should know about this post.
This is NOT really a recipe for fried chicken. If that’s what you’re looking for, then this is probably not a place to start. Or maybe it’s the perfect place to start, since this post is more about the grand opportunity for experimentation in your kitchen!
When I decided that I would undertake the culinary challenge of making incredibly delicious fried chicken at home, I also decided that I would try to document the process the best I could. If I was to ever undertake such a task again, it would be helpful to remember exactly what I tried before, what worked and what didn’t. “The difference between screwing around and science is writing it down!”
Why the decision to lead with this note-taking format instead of building an instructional recipe post for others to follow? Simply put: fried chicken is a lot of work, and it’s difficult to recipe test (unless you have a rotating army of folks to feed it to). None of it is particularly difficult per se, but if you’re going to make really good fried chicken, there’s a chance that you’ll need to carve out adequate time to do it. There are, of course, the traditionalists who don’t bother with brining and make fried chicken in one afternoon—and hats off to those folks. That method has never worked for me… But I digress. Having just tried this recipe and method once, there are definitely small tweaks I’d like to make before I think it would yield truly terrific fried chicken. Of course, I can’t keep making fried chicken for every weekly-treat-meal, so it will definitely be a while before I even get to test it again. I’d love to make it our yearly Easter tradition!
And while it should go without saying, I still feel inclined to reiterate that fried chicken is obviously a treat meal entree and is obviously not health food or low carb or any of the like. We only live once. Have a piece of fried chicken, and enjoy yourself.
So what does it look like, recipe testing an involved-and-in-depth recipe like fried chicken?
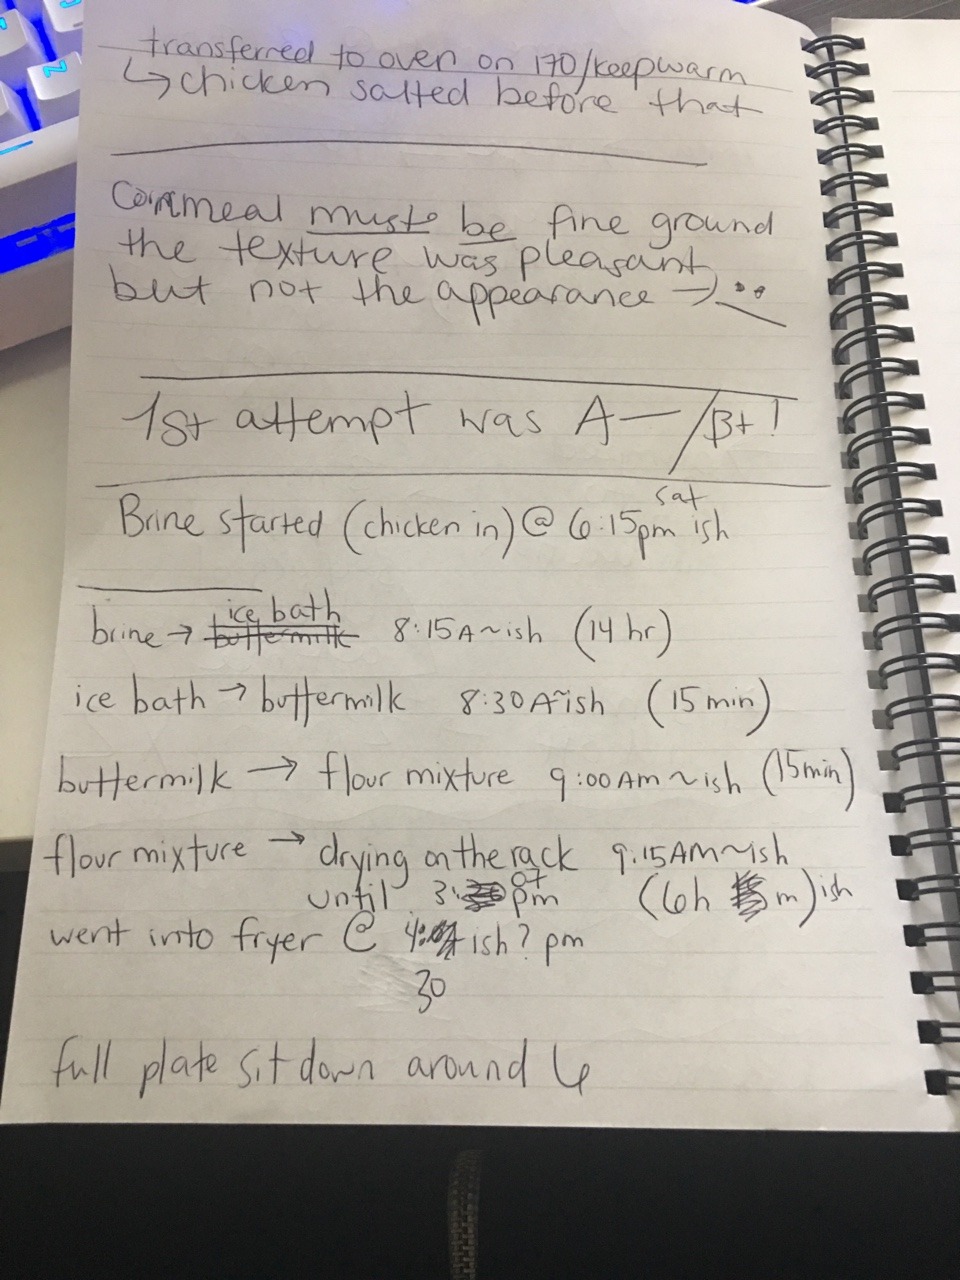
Well… some of it looks like this. I was also working on my computer during the less-messy stretches, so these are the barest of notes.
Ready for more chaos? Here’s what the transcription looks like:
APFE’S RECIPE TEST FOR FRIED CHICKEN #1
Ingredients
The Chicken
- 3.5 pounds of skinless, boneless thighs. [I realize that this is a sin to most fried chicken enthusiasts, but out of personal preference and because I’ve seen it done, I opted for this preparation. It turned out really well, so I’m more than confident that it would be a fine option for anyone who loves fried chicken.]
For the Brine
- 1 gallon of water – 2 liters hot and 2 liters worth of ice cubes to chill it down
- 38 Black Tea bags
- 1 cup kosher salt
- 1 cup sugar
For the Buttermilk Soak
- 2 quarts buttermilk (original recipe calls for whole-milk-buttermilk, but I couldn’t find that at the market, so I used 1% milk fat buttermilk)
- 3 tablespoons hot sauce [I used the end of a bottle of Frank’s Hot (regular) and then a heaping spoonful of sriracha to make up the difference.]
- Heaping grind of fresh black pepper
For the Flour-Based ‘Dredge’
- 6 cups flour* [I feel that there is a lot of waste in the flour dredge portion of this recipe! I’m conflicted though because during the resting portion, where the chicken first sits ‘submerged’ in the flour-based dredge, it wasn’t too much, and all of the chicken was adequately covered. But to see essentially 7+ cups of flour and seasonings get dumped in the trash afterwards was disheartening. I’m curious to see if a change in vessel for this portion—I used my largest mixing bowl to ‘submerge’ the chicken—if maybe something like a plastic service tub, or even my 13×9 pan would be a better vessel; I could use less flour (keep the rest of the seasoning + cornmeal the same) and still get great coverage. Will definitely experiment with that idea if/when I make fried chicken again.]
- 1 cup cornmeal (original recipe calls for fine ground, but I could only find medium ground, so that’s what I used)
- 2 tablespoons corn starch
- 1 tablespoon garlic powder
- 1 tablespoon onion powder
- ½ teaspoon Cayenne
- ~1 tablespoon paprika
For the frying portion
- 16 ounces of lard
- Vegetable oil
- Sage for flavoring
Test Portion A – The Brine
Day 1 – Brine was started, allowed to cool, and then chicken went in. This was at 6:15 PM Saturday Night. 38 tea bags seems ridiculous, but we’re in this. Tea-based brine looks as strange as you’d imagine. While brine was cooling, chicken was prepared (trimmed off excess fat).
Day 2 – [14 hrs later] at around 8:15 AM, chicken moves from brine → ice bath for 15 min. The ice bath helps to remove any impurities from the brine/excess tea matter.
Test Portion B – The ‘Marinade’
[Day 2 Continued from here on]
Ice bath → Buttermilk Marinade Mixture @ 8:30 AM, sits in marinade for only 15 min plus a little extra when you factor in preparing the next step.
Test Portion C – The Great Flour Burial and Rack
Buttermilk Marinade → Flour mixture. @ 9:00 AMish. Burying the chicken in a bowl of flour-seasoning mix feels strange, but when in Rome. Am looking to scale the actual flour proportion down as it does feel like it yields lots of extra waste, but this test run did yield great chicken, so it might just be the cost of doing business…? Chicken stays buried for 15 min.
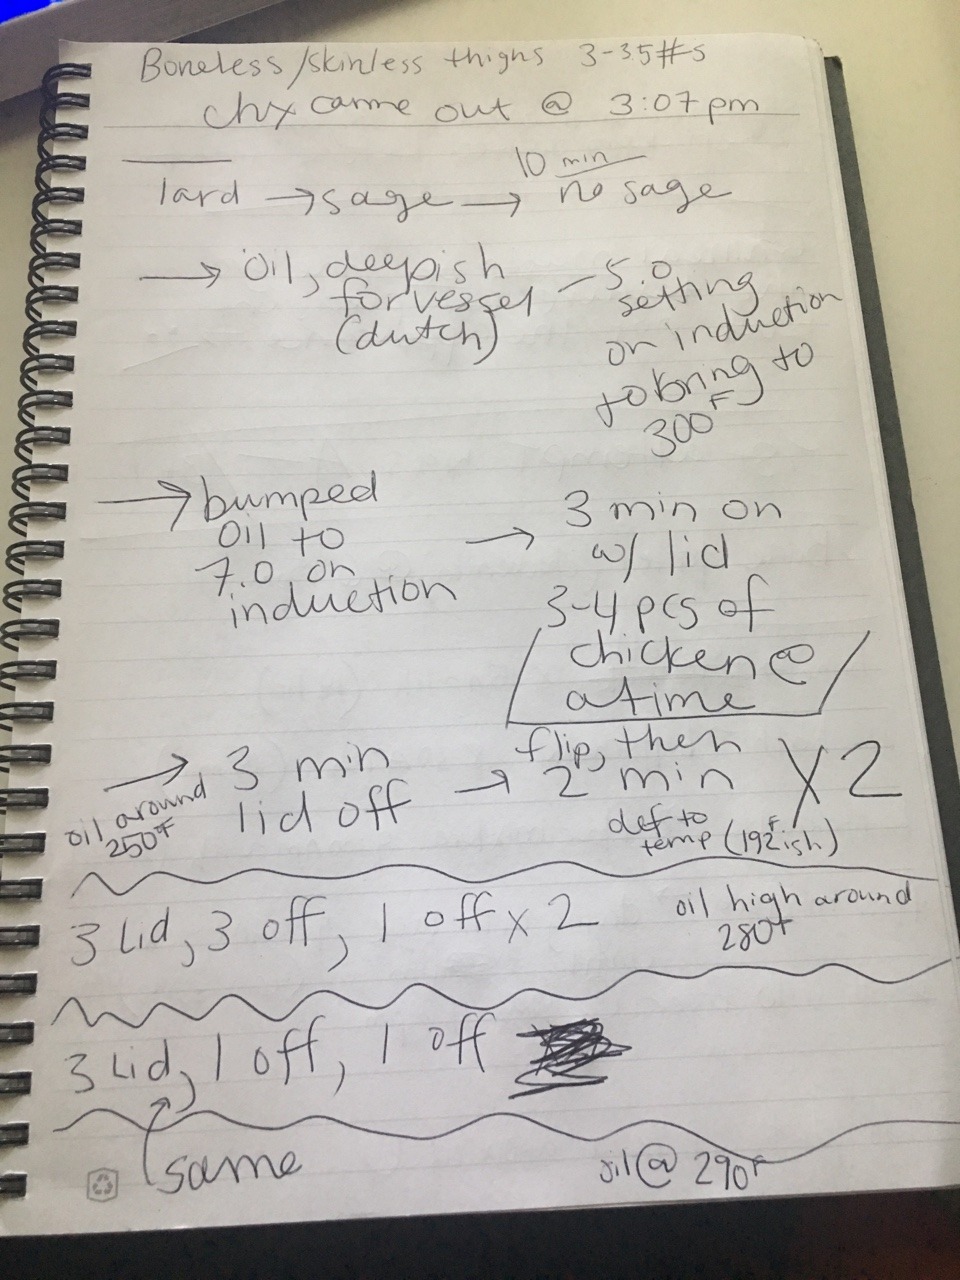
Flour Mixture → Drying on a cooling rack over a sheet pan in the fridge. The timing on this step is somewhat subjective. I let mine sit about 6 hrs because that’s when I was ready to start the actual frying process. Went on the rack around 9:15 AM and was later removed from the fridge at 3:07 PM.
Rack → Fryer @ about 4:30 PM – Delay due to prepping outside fry station.
Test Portion D – The Great Fry!
Start with lard → Melt and infuse with sage for 10 min. This was an unnecessary step, and I don’t think it added any flavor to the process, so I won’t be doing it again. I only included the lard at all because I had a 16 ounce tub that I bought a while ago for another project that fell by the wayside… and I wanted to use it. I’m spring-cleaning everywhere. Even the kitchen!
Lard → Add enough oil to the deep vessel that you’ve chosen to fry in. I used my trusty Dutch Oven. What is ENOUGH oil? Eyeball it. The chicken should be able to move easily about the vessel and be fully submerged. Go with your gut. I chose to fry using my induction cook-top so that I could FRY OUTSIDE. Started the temperature on 5.0, which is pretty hot, in hopes of reaching 300°F for frying.
5.0 → 7.0 on the induction to bring the temperature up further!
Oil temp FINALLY comes up to 250°, and it as a rolling bubbling. Party is starting!
Drop 3-4 pieces of chicken depending on size into the dutch. Allow to fry for 3 min with the lid of the dutch on → 3 min of frying with the lid off → flip, then cook for an additional two min, and flip again. :|| (You know, repeat.)
Realize the first batch is cooked WELL to temp. Batter has crusted BEAUTIFULLY, so they’re not burnt or even “well-done,” but temp of chicken reads 192°F, so you start to revise the timing intervals.
Drop the next batch, and use the following:
3 min with lid → 3 min without lid (no flip) → [1 min without lid & a flip] x 2
Oil Temp reads 280°F during this mini-trialThis batch is also to temp, and since oil temp is steadily climbing, another revision of timing.
Drop next batch, and use the following:
3 min with lid → 1 min without lid (no flip) → 1 min without lid & a flip
The timing on this last batch still yielded a great crust, great color, and the chicken was definitely cooked to temp! Oil temperature clocked in at 290°F on the last batch.
Repeat the previous timings for the very last batch.
While I was frying each batch, my sous-chef was transferring finished chicken to an oven on 170°F/Keep Warm setting. VERY IMPORTANT NOTE THAT I SHOULD HAVE MENTIONED BEFORE: Chicken was immediately finished with a liberal salt-sprinkle to ensure a great overall tasting experience!
Additional notes: I bought medium-grind cornmeal based on what my store had to offer, but I should’ve held out for fine-ground or processed it myself in the food processor to make it finer. It was a delightful texture but did make itself known in the actual appearance, and I didn’t love the visual effect. The crust itself was really delicious and flavorful, but there was the smallest aspect that I think can be improved upon, and I believe the culprit was the amount of cornstarch included in the flour mixture. I already have plans to modify the flour mixture’s proportions in the future, so I’ll experiment with less cornstarch as well.
All in all? An A-/B+ result for this first ever run of this particular fried chicken recipe!
See what I mean? Not only might that seem a little intimidating to novice cooks, it’s also a lot to read and process. If I ever get everything tweaked to my liking, I’ll definitely streamline it to a proper recipe… It’s just not ready for a grand debut, and as I mentioned before, fried chicken isn’t something one should consume regularly… It might be a grand while before I try my hand at it again.
Are you ready to see the final results?

This is post-frying and post-oven warming. The crust did darken just a little bit during the oven-warm portion but not overly so. You can see the flecks of the cornmeal. A finer ground will eliminate that.

Here’s just a brief shot of the rest of the spread. The pasta salad was a ‘spin-on-deviled-eggs-pasta-salad.’ It was good, but the noodles they called for were very large. We also made a grand salad with fresh green goddess dressing and maple-harissa carrots for our vegetables.

Full plate shot! Dang! It was a really good dinner.
This first-attempt recipe test was a positive experience! It really helped to have committed enough time to do it properly and to have a second set of hands (Thank you, BP!) to help at a moment’s notice. If you’re able to set up your frying station outside, I definitely recommend it. You won’t stink up your house or make a ridiculous mess in your kitchen. There won’t be zero-mess, but it is much easier to manage if you go the outdoor-set-up route!
What’s your favorite time-consuming/labor-of-love recipe you like to make? Or what have you been dying to make but can’t quite commit to because of time constraints? Are you a fried chicken master and have some tips to share? All of the above? Leave me a comment below!

You guys know the drill! Wanna show your appreciation for APFE and the free content provided here? You can totally Buy Me A Coffee! It’s much appreciated and helps keep us Big-Corporate-Ad-Free!
